
Introduction
The Canvas API in Virtalis Reach enables developers to incorporate HTML5 Canvas elements into their visualisations. The Virtalis Reach web viewer does this by managing a Canvas control instance, compositing the 2D renderings within the 3D view, and dispatching events such as user input.
Developers control the canvas by implementing a number of JavaScript callback methods which execute when the visualisation is viewed in a web browser. Within the callback implementations the developer’s scripts can call the HTML5 Canvas APIs as needed to generate 2D graphics and also use many of the other APIs exposed by the web browser.
The canvas allows a wide range of functions and features to be enabled to increase the utility of Virtalis Reach across a range of domains.
Embedding web canvases within Virtalis Reach allows scenes to be enriched in a number of different dimensions. For example:
- Users can take advantage of rich 2D user interfaces (UIs)
- Slide shows or videos can be embedded in visualisations
- Connections to live data feeds can be established and displayed
This document assumes that the reader has experience/knowledge of HTML5 Canvas, Java scripting and Lua scripting.
Please note: This document includes examples of preparing visualisations using Visionary Render. Please refer to the Visionary Render documentation for further information.
See also:
Introducing the Virtalis Reach Canvas
Embedded Canvas Elements
Many visualisations, particularly those for immersive training, need to simulate complex 2D Graphical User Interfaces (GUIs) embedded within the 3D scene. This allows the visualisation to replicate widgets such as Human-Machine Interface (HMI) control panels, graphical displays, and interactive information sign boards, or have synthetic information sources such as pop-up hints, graphs, and documents.
Programming all the functionality to achieve rich interactive 2D UIs from scratch in Virtalis Reach would be extremely time-consuming and it would be difficult to attain a satisfactory product for authors.
The platform for the Virtalis Reach Client (Yeti) is a standard web browser, and web browsers have evolved and developed a rich feature set over many decades to support rich, interactive 2D experiences. In the broadest sense, the most sensible solution is to enable visualisations in Virtalis Reach to also use the browser’s own features.
What is a Canvas?
Introduced in 2005 by Apple, and later adopted by all web browsers, and then finally added to the HTML5 specification, the Canvas element:
(From Wikipedia)
“allows for dynamic, scriptable rendering of 2D shapes and bitmap images. It is a low level, procedural model that updates a bitmap and does not have a built-in scene graph, but through WebGL it allows 3D shapes and images to be displayed. HTML5 Canvas also helps in making 2D games.”
Using a Canvas element, a web designer can create graphics panels containing many elements such as images, a subset of HTML and 2D vector graphics.
Architecture
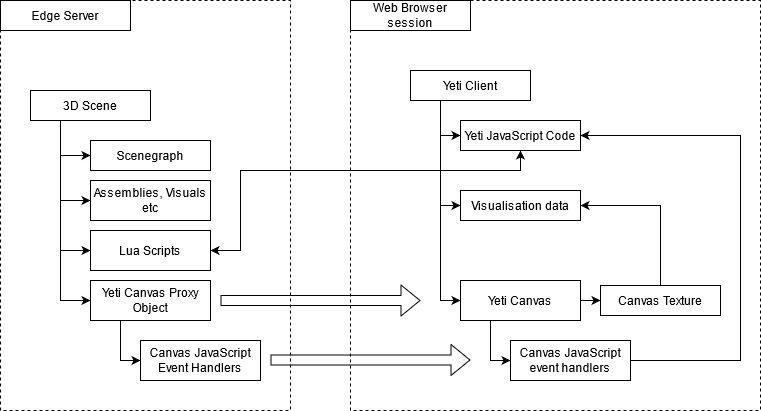
The Edge server has loaded a visualisation of a 3D scene.
The visualisation contains a scenegraph consisting of data elements such as:
- Assemblies
- Visuals
- Lua scripts
- Canvas Proxy Objects
Canvas Proxy Objects define a Canvas element, consisting of such properties as:
- JavaScript code to handle canvas events
- Dimensions
Canvas Proxy Objects are mapped to a mesh surface in the scenegraph using a material, via a texture.
The visualisation is loaded into the Web browser session.
In the Web browser session HTML5 Canvas elements corresponding to each Canvas Proxy Object are created.
The Canvas’s JavaScript code is copied to the browser session and compiled.
The texture corresponding to each Canvas element is drawn on the appropriate mesh surface
The Canvas JavaScript code is evoked to handle events by the Yeti JavaScript code. Events such as:
- Rendering the current image
- Mouse move
- Mouse enter/leaves
- Mouse click
Immersive hand controllers will emulate appropriate input events, for example mouse events will correspond to a finger or short laser pointer.
Canvas Scripting
Callbacks
You deliver your JavaScript in the form of Callbacks. Callbacks are a pre-defined set of functions in a specific format that the Virtalis Reach engine utilises to validate and execute the script in a Canvas item. You are offered the following set of callbacks:
- <inline-code>init(dirty, canvasData)<inline-code>
- <inline-code>paint(canvas, canvasData)<inline-code>
- <inline-code>dataChanged(canvasData)<inline-code>
- <inline-code>enabledChanged(canvasData)<inline-code>
- <inline-code>sendLuaFunc(funcName, parameters)<inline-code>
- <inline-code>onMouse(canvasData, eventType, eventData)<inline-code>
- <inline-code>onFocus(canvasData)<inline-code>
- <inline-code>onBlur(canvasData)<inline-code>
- <inline-code>onDispose(canvasData)<inline-code>
Init Callback
Each canvas must have an init function defined. This is the only function passively called by the canvas. It is only called once the canvas is given a valid canvas ID. After that, the canvas will never call the init function again. The function is called with two parameters (<inline-code>init(dirty, canvasData)<inline-code>)
- <inline-code>dirty<inline-code> is a function pointer to tell the canvas that it needs to be redrawn
- <inline-code>canvasData<inline-code> is an object that contains all data utilised by the script
The dirty method is a simple function without parameters or a returning value <inline-code>dirty: function(){}<inline-code>. You can request a re-paint action for the next frame by triggering this dirty function in the script (<inline-code>dirty();<inline-code>)
Refer to canvasData for further information.
Paint Callback
This callback draws the output to a Canvas item. It is driven from the init’s callback dirty function that a repaint of the Canvas item is needed. The paint callback is called with two parameters (<inline-code>paint(canvas, canvasData)<inline-code>)
- canvas is the HTML canvas context
- canvasData is an object that contains all data utilised by the script (same as init callback)
DataChanged Callback
This callback is called when the data values from the server are changed. This callback enables you to update their script behaviour from Canvas items property changes.
Let’s assume that you have defined a Canvas item that contains metadata with a colour value and that the script is used to colour the background of the Canvas item. When this colour value changes, the server notifies the client with the changes. Your script can then register a DataChanged callback to act on this colour change.
This callback uses a single parameter (<inline-code>dataChanged(canvasData)<inline-code>)
- <inline-code>canvasData<inline-code> is an object that contains all data utilised by the script (same as init callback)
EnabledChanged Callback
This callback is used to act on an enable state change of a Canvas item. As with the dataChanged callback, this uses a single parameter (<inline-code>enabledChanged(canvasData)<inline-code>)
- <inline-code>canvasData<inline-code> is an object that contains all data utilised by the script (same as init callback)
onMouse Callback
This callback is called when a mouse event happens and the canvas has focus. This function is called with three parameters (<inline-code>onMouse(eventData, eventType, canvasData)<inline-code>)
- <inline-code>eventData<inline-code> is the data related to the mouse event.
- <inline-code>canvasData<inline-code> is an object that contains all data utilised by the script (same as init callback).
- <inline-code>eventType<inline-code> a string representing the mouse action. The available events are mousedown, mousemove, mouseup, click and double-click.
onFocus Callback
This callback is called when the script gains focus. This function is called with one parameter (<inline-code>onFocus(canvasData)<inline-code>)
- <inline-code>canvasData<inline-code> is an object that contains all data utilised by the script (same as init callback)
onBlur Callback
This callback is called when the script loses focus. This function is called with one parameter (<inline-code>onBlur(canvasData)<inline-code>)
- <inline-code>canvasData<inline-code> is an object that contains all data utilised by the script (same as init callback)
onDispose Callback
This callback is called when the scene is left. This function is called with one parameter (<inline-code>onDispose(canvasData)<inline-code>)
- <inline-code>canvasData<inline-code> is an object that contains all data utilised by the script (same as init callback)
Data Types
canvasData
canvasData is a container for the data used in our JavaScript code. It contains three different objects:
- <inline-code>serverCanvasProperties<inline-code> is the object received from the server and contains user defined information. This is useful if you want similar functionality for multiple canvases but want different parameters (for example, for something that flashes between two colours, the script could be the same and it just reads the user data to get the two colours). In any scripts that use <inline-code>serverCanvasProperties<inline-code> the data should be treated as read only as it will be replaced when the canvas receives an update from the server.
- <inline-code>localContext<inline-code> is the object storing local data for the specific Canvas item. It is always an empty object when the canvas is created and can only be modified by the script attached to that canvas.
- <inline-code>enabled<inline-code> enable status of the Canvas item. This value should be treated as read only as it will be overwritten when the canvas receives an update from the server.
eventData
eventData is a container for the data used in our JavaScript code. It contains four different objects:
- <inline-code>button<inline-code> is the button which triggered this event (same as mouseEvent button)
- <inline-code>buttons<inline-code> is an integer with the value of each bit corresponding to the pressed state of a mouse button (same as mouseEvent buttons)
- <inline-code>x<inline-code> is the x position of the mouse pointer in the range of 0 to canvas width
- <inline-code>y<inline-code> is the y position of the mouse pointer in the range of 0 to canvas height
Templates
Simple Example
Destructured Example
You can also destructure the canvasData to its three objects for easy referencing:
Formatting
All scripts are processed and placed inside a JavaScript object. Any variables that are defined are local to that script but are shared across all canvas’s that reference that script if you want a variable that is local to the canvas assign it to the <inline-code>canvasData.localContext<inline-code>. To access any other local variable or function you need to use this. to reference it.
Remote Lua Execution
sendLuaFunc Function
The <inline-code>sendLuaFunc<inline-code> function is used to request that the server’s scripting environment execute a remote procedure call of a Lua function that is currently defined in the visualisation. This enables, for example, mouse events on a canvas to trigger animation sequences. (<inline-code>sendLuaFunc(funcName, parameters)<inline-code>)
- funcName name of the function
- parameters parameters of the function in array format. Numbers (either a integer or floating point) and strings are supported.
Return Value and Error Codes
There is no return value from <inline-code>sendLuaFunc<inline-code>. The client code will not be notified if the requested Lua function could not be executed by the server, for example if the parameters are incorrect or the function does not exist. If unexpected behaviour occurs the servers and clients logs should be checked for diagnostic messages.
Asynchronous and Out-of-Order Execution
Calling <inline-code>sendLuaFunc<inline-code> results in remote procedure calls that are processed by the server asynchronously and not always in the same order as they were submitted. This means that client code after <inline-code>sendLuaFunc<inline-code> is likely to execute before the Lua function on the server has done so, which can lead to illogical outcomes if not accounted for during development. Additionally, several calls to <inline-code>sendLuaFunc<inline-code> might be executed in a different order to when they were submitted. Structure the client and server code so that the client makes few calls to sendLuaFunc which invoke self-contained server-side Lua functions, rather than developing many inter-related server functions and linking them by making many calls to <inline-code>sendLuaFunc<inline-code>.
Canvases in Collaboration
The client JavaScript code for a canvas executes only in the web browser of the user viewing the visualisation, a consequence of this is that during a collaborative multi-user session the canvas visualisation author is required to ensure that the canvases for all the users are displaying the expected content.
This requires ensuring that changes to the visual state of a canvas are propagated to all users. For example, a canvas which displays a single button that the user can toggle between green and blue using a mouse click will not maintain a consistent visual state in a multi-user collaboration unless the scripting is used to ensure that when any user presses the button the correct colour is shown on the canvas of all the users web browsers.
This can be achieved by combining remote procedure calls to Lua with the <inline-code>serverCanvasProperties<inline-code> and the <inline-code>DataChanged<inline-code> callback. The author must decouple the properties of the canvas (the document or model), from its view code (the view) and its event dispatching code (the controller). Using a Model/View/Controller pattern ensures that the state of a shared object with many views and controllers remain logical. In the example, a correct implementation would be programmed so that when any user presses the button, a remote Lua call (<inline-code>sendLuaFunc<inline-code>) is used to call a Lua function which sets the properties of the Canvas. This will then trigger the <inline-code>dataChanged<inline-code> callback for the canvas in the web browser of all the users in the collaboration. The implementation of dataChanged would then invalidate the canvas by calling <inline-code>dirty<inline-code>, and the <inline-code>paint<inline-code> implementation would draw the canvas using the server properties. By ensuring the separation of Model/View/Controller then the visualisation remains correct.
Code Example
This is an example of calling a Lua function called funcName from the client-side JavaScript code:
Limitations and User Responsibilities
Unlike HTML canvasses, you cannot set the canvas width and height using JavaScript in a Virtalis Reach canvas. Instead, you need to set the resolution using a Lua script. It should also be noted that if you use the clip() function you must save() before the clip and then restore() once you are done. If these steps are not completed there can be rendering issues with other canvasses.
Configuring a Visionary Render Scene
Visionary Render scenes store canvas information and their data in a configuration that the Virtalis Reach Client (Yeti) can recognise and create the necessary elements for a script to be executed on the canvas. It is essential to describe the information in such a structure and with the necessary information that the client needs to correctly calculate the results.
Since this is a Virtalis Reach application-specific feature, there is no immediate method to create a Canvas or a Script node in the Visionary Render environment. You can, however, create these items in the scene, place them and configure them using existing nodes structured as outlined in the following sections.
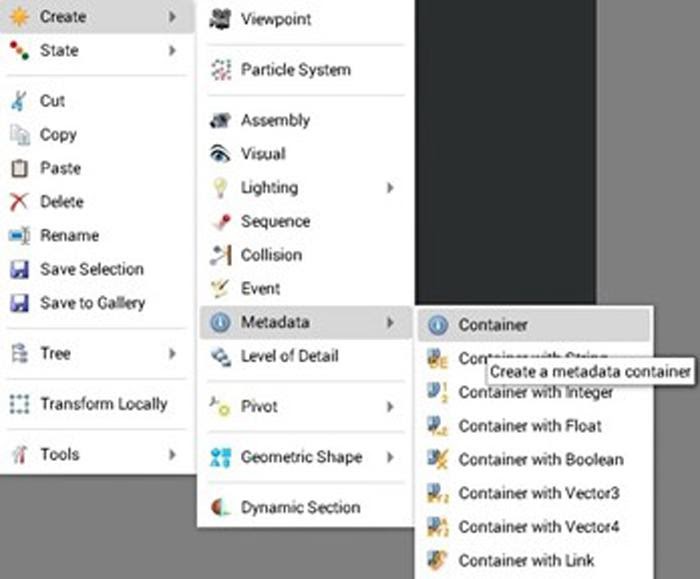
Canvas Script Item
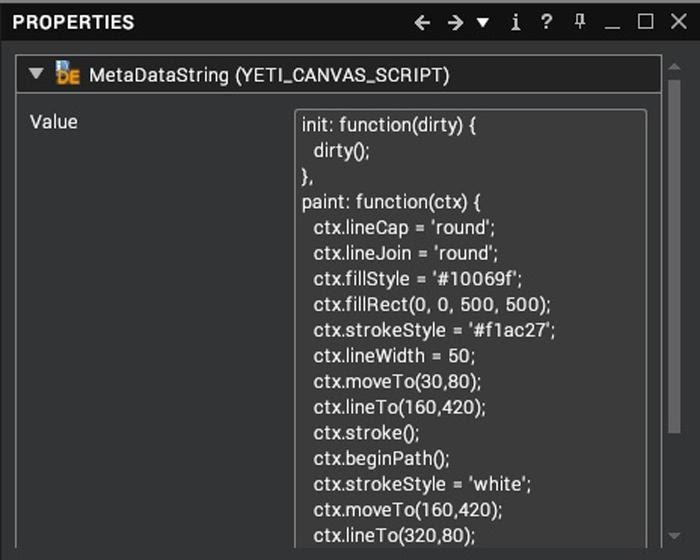
A canvas script item is used to pass the script (JavaScript) to the client so it can render on a Canvas node. It is a Visionary Render Metadata container (MetaGroup) node with a specific name (YETI_CANVAS_SCRIPT) and a metanode child that contains the JavaScript code. A script can be shared among multiple canvas nodes. You can create your own metadata nodes with custom names and values. The information from these is passed to the script as a JavaScript object to customise the behaviour.
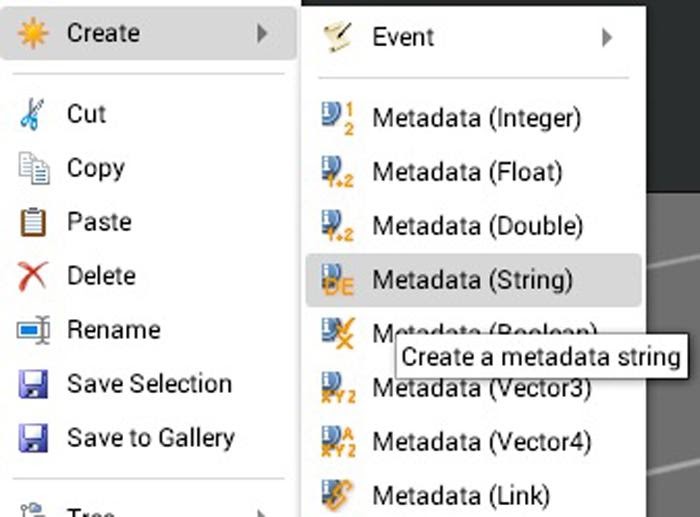
To define a Script item in the scene, you need to create an assembly node that contains a metagroup node (name YETI_CANVAS_SCRIPT) with a string metadata entry (called YETI_CANVAS_SCRIPT). The script data can be set to the string metadata value field.

Adding Custom Scripts
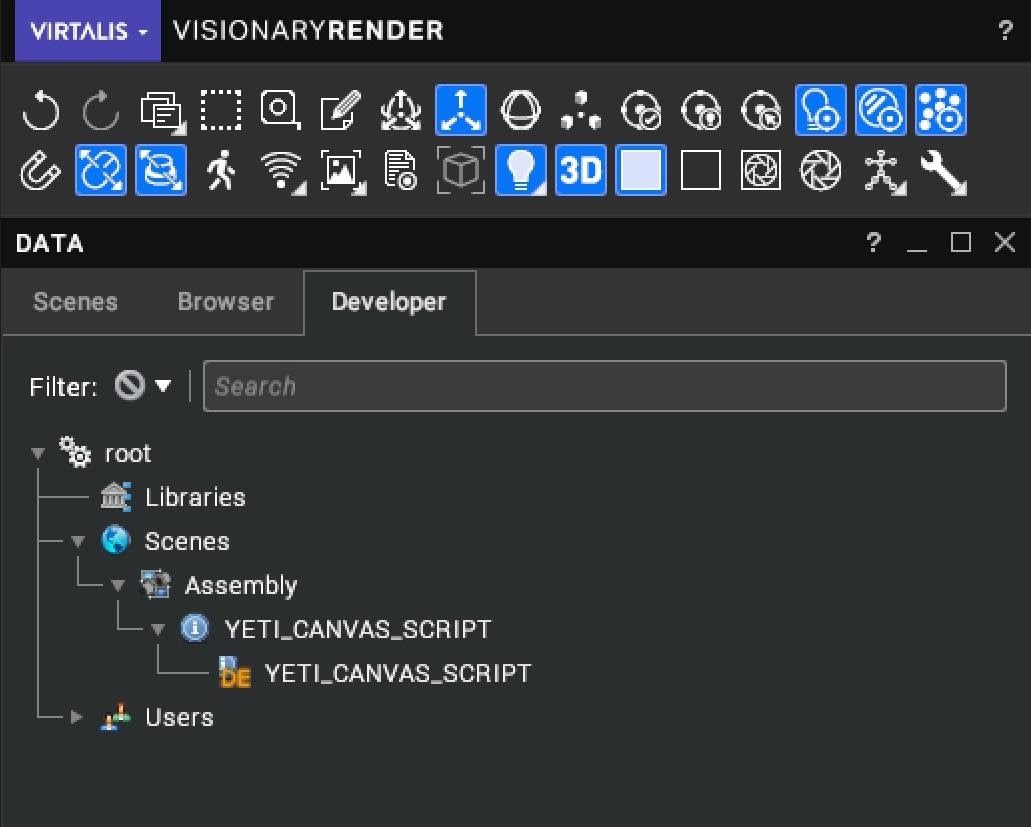
There are two different editors accessible within Visionary Render.
The first is accessible from the Scenes tree when an Assembly is selected and edits all the metadata together. This breaks new lines.
The other method is to access the MetaDataString node directly from the Developer tree. This does not break new lines.
Canvas Item
A Canvas item contains the script that is rendered on in Virtalis Reach. The canvas is assigned a size and a resolution for the rendering output and is linked with a script node. These are the core properties that a canvas is using and Reach expects to be described so that it can create all elements for rendering a script on the canvas in reference.
You can define a list of your own data used in the script through Metadata nodes in the Canvas item container (MetaGroup). A variety of different value types included in the Visionary Render context menu are supported (int/float/string/vector, and so on), as well as other types not exposed to the context menu but available on application’s scripting (arrays). Link metadata nodes are not supported.
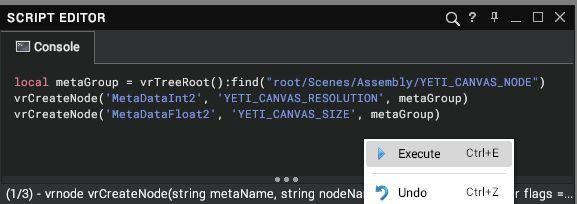
Please note: Visionary Render does not currently offer menu entries to create metadata of type Float2 and Int2 necessary to create the size and resolution properties of the Canvas. Nevertheless, these metadata nodes can be created through Lua scripting. Bring up the scripting window (Ctrl+L) and drag and drop the MetaGroup container (YETI_CANVAS_NODE) on to the Lua scripting window to get a reference to the metagroup.
You then need to create two new nodes as children to the metaGroup node:
Enter these two lines as shown in the image below. Right-click and execute the code. You can view the new properties created for you in the scenes tree.
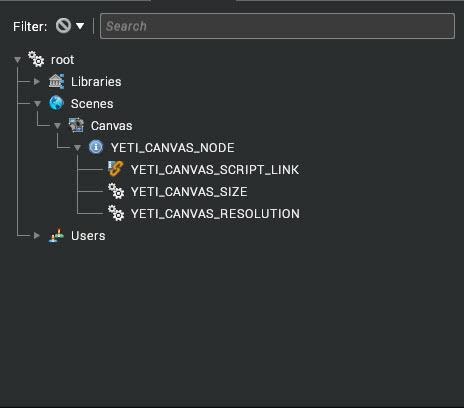
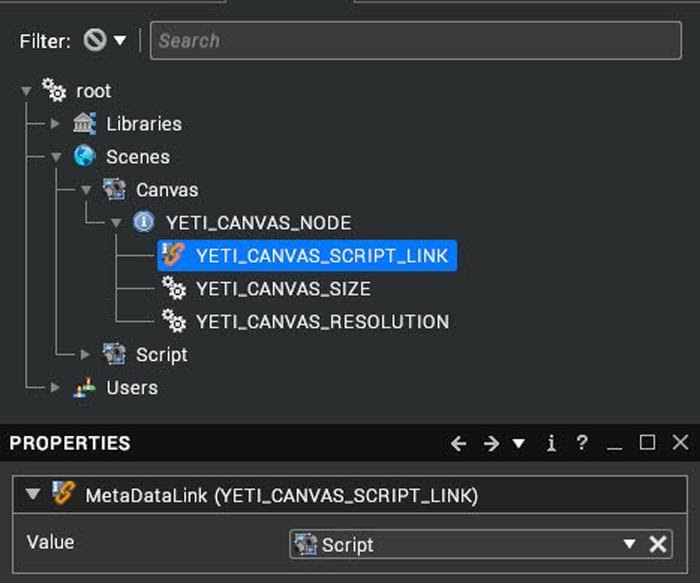
The configuration of a Canvas item is similar to the Script node with the extra metadata nodes required. You need to create an Assembly node with a MetaGroup container (called YETI_CANVAS_NODE), the three core properties as Metadata nodes and any number of user defined metanodes:
- MetaDataLink for the linked script node (YETI_CANVAS_SCRIPT_LINK)
- MetaDataFloat2 for the canvas size (YETI_CANVAS_SIZE)
- MetaDataInt2 for the canvas resolution (YETI_CANVAS_RESOLUTION)

Canvas Proxy Item
The current Canvas/Script structure provides no information to help you to understand the position or the size of a Canvas in space and accurately author your scene. Visionary Render offers a variety of objects that render in the scene and could be used as proxies to help ‘visualise’ a Canvas item in the scene.
Start by creating the items in your Canvas by following the steps below:
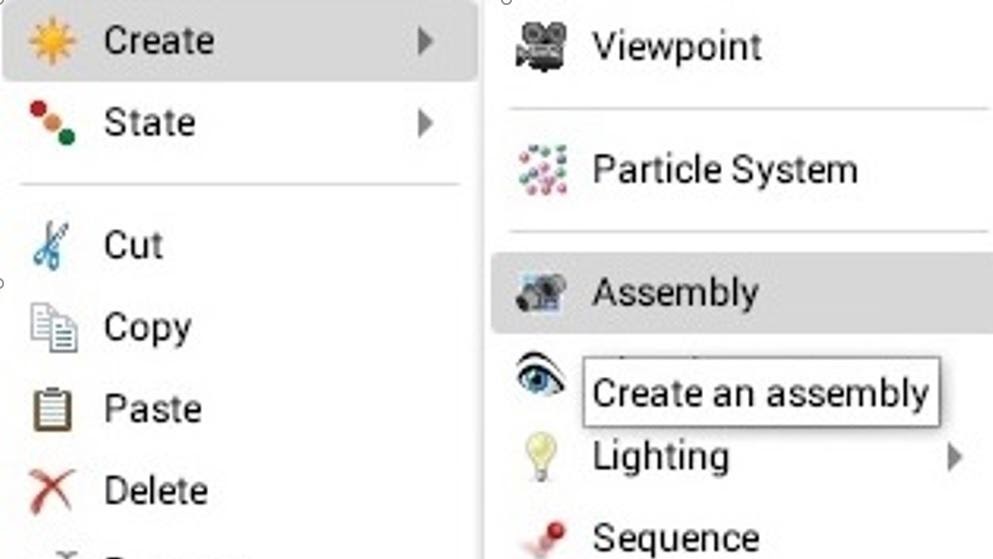
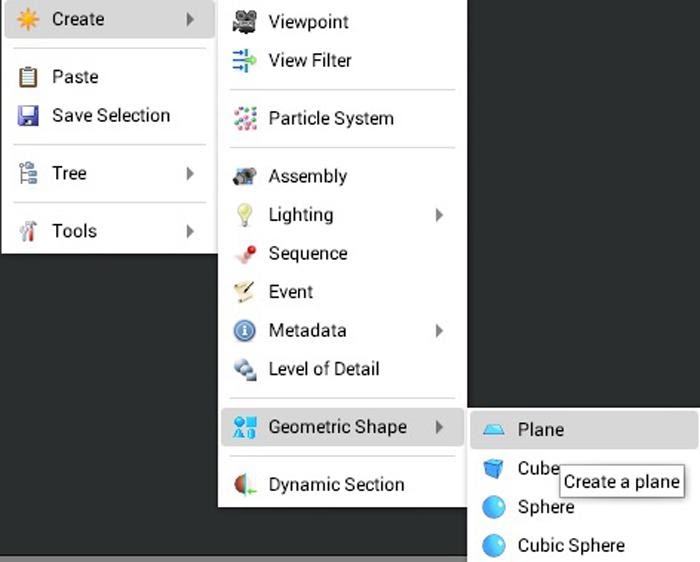
- Select Canvas item and right-click to bring up the context menu and select Create > Assembly. You can rename this to, for example, something such as Proxy.
- Select the new Assembly, right-click to bring up the context menu and select Create > Geometry Shape > Plane.
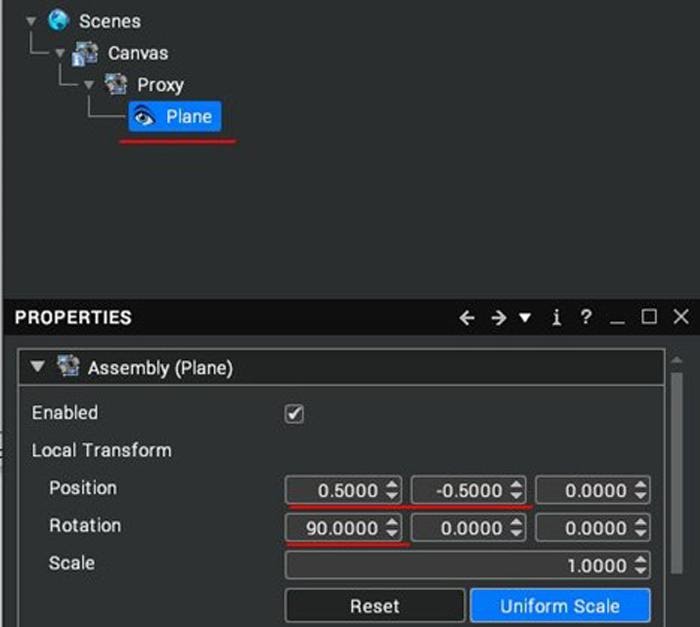
- Select the Plane node and change the Position X and Y to 0.5 and -0.5 respectively.
- Change Rotation X to 90.0 degrees.

Now you can select the Canvas Assembly to position the canvas in the scene and use the Proxy assembly scale to configure the size of your canvas. Make sure to pass the scale values (XY) to the YETI_CANVAS_SIZE metanode values.
Please note: Ensure that you disable the proxy before you save your project as you do not want this proxy object to be treated inside the Virtalis Reach Client.
Canvas Item Lua Script
All the above steps are summarised to the Lua script below. Paste the script below inside a Lua script window in Visionary Render to create a Canvas item in the scenes branch:
Script Examples
Simple White Canvas
Still Image Drawn Using HTML Canvas Commands
Simple Flashing Canvas
Flashing Canvas that Uses serverCanvasProperties
serverCanvasProperties
Rendering a Video